TinyWM - najlżejszy menadżer okien na świecie
Kategoria: Artykuły, etykiety: środowisko graficzne, system, serwer
Dodany: 2011-01-01 18:48
(zmodyfikowany: 2011-01-01 18:51)
Przez: mati75
Wyświetleń: 19516
Witajcie! Już dawno miałem opisać ten menadżer okien dla systemów Linux i BSD. Według danych na dzień dzisiejszy jest on najlżejszym dostępnym. Przedstawie dwa zastowania dla niego.
Podzieliłem tekst na 3 części:
Część 1 
Kod źródłowy
Oczywiście nie będę wszystkiego opisywał, bo nie oto chodzi. Cały kod źródłowy to 50 linijek w języku C. Mniej już się nie da. Wersja 1.3 wygląda tak:
/* TinyWM is written by Nick Welch , 2005.
 *
 * This software is in the public domain
 * and is provided AS IS, with NO WARRANTY. */

/* much of tinywm's purpose is to serve as a very basic example of how to do X
 * stuff and/or understand window managers, so i wanted to put comments in the
 * code explaining things, but i really hate wading through code that is
 * over-commented -- and for that matter, tinywm is supposed to be as concise
 * as possible, so having lots of comments just wasn't really fitting for it.
 * i want tinywm.c to be something you can just look at and go "wow, that's
 * it?  cool!"  so what i did was just copy it over to annotated.c and comment
 * the hell out of it.  ahh, but now i have to make every code change twice!
 * oh well.  i could always use some sort of script to process the comments out
 * of this and write it to tinywm.c ... nah.
 */

/* most X stuff will be included with Xlib.h, but a few things require other
 * headers, like Xmd.h, keysym.h, etc.
 */
#include

#define MAX(a, b) ((a) > (b) ? (a) : (b))

int main()
{
    Display * dpy;
    Window root;
    XWindowAttributes attr;

    /* we use this to save the pointer's state at the beginning of the
     * move/resize.
     */
    XButtonEvent start;

    XEvent ev;


    /* return failure status if we can't connect */
    if(!(dpy = XOpenDisplay(0x0))) return 1;

    /* you'll usually be referencing the root window a lot.  this is a somewhat
     * naive approach that will only work on the default screen.  most people
     * only have one screen, but not everyone.  if you run multi-head without
     * xinerama then you quite possibly have multiple screens. (i'm not sure
     * about vendor-specific implementations, like nvidia's)
     *
     * many, probably most window managers only handle one screen, so in
     * reality this isn't really *that* naive.
     *
     * if you wanted to get the root window of a specific screen you'd use
     * RootWindow(), but the user can also control which screen is our default:
     * if they set $DISPLAY to ":0.foo", then our default screen number is
     * whatever they specify "foo" as.
     */
    root = DefaultRootWindow(dpy);

    /* you could also include keysym.h and use the XK_F1 constant instead of
     * the call to XStringToKeysym, but this method is more "dynamic."  imagine
     * you have config files which specify key bindings.  instead of parsing
     * the key names and having a huge table or whatever to map strings to XK_*
     * constants, you can just take the user-specified string and hand it off
     * to XStringToKeysym.  XStringToKeysym will give you back the appropriate
     * keysym or tell you if it's an invalid key name.
     *
     * a keysym is basically a platform-independent numeric representation of a
     * key, like "F1", "a", "b", "L", "5", "Shift", etc.  a keycode is a
     * numeric representation of a key on the keyboard sent by the keyboard
     * driver (or something along those lines -- i'm no hardware/driver expert)
     * to X.  so we never want to hard-code keycodes, because they can and will
     * differ between systems.
     */
    XGrabKey(dpy, XKeysymToKeycode(dpy, XStringToKeysym("F1")), Mod1Mask, root,
            True, GrabModeAsync, GrabModeAsync);

    /* XGrabKey and XGrabButton are basically ways of saying "when this
     * combination of modifiers and key/button is pressed, send me the events."
     * so we can safely assume that we'll receive Alt+F1 events, Alt+Button1
     * events, and Alt+Button3 events, but no others.  You can either do
     * individual grabs like these for key/mouse combinations, or you can use
     * XSelectInput with KeyPressMask/ButtonPressMask/etc to catch all events
     * of those types and filter them as you receive them.
     */
    XGrabButton(dpy, 1, Mod1Mask, root, True, ButtonPressMask, GrabModeAsync,
            GrabModeAsync, None, None);
    XGrabButton(dpy, 3, Mod1Mask, root, True, ButtonPressMask, GrabModeAsync,
            GrabModeAsync, None, None);

    for(;;)
    {
        /* this is the most basic way of looping through X events; you can be
         * more flexible by using XPending(), or ConnectionNumber() along with
         * select() (or poll() or whatever floats your boat).
         */
        XNextEvent(dpy, &ev);

        /* this is our keybinding for raising windows.  as i saw someone
         * mention on the ratpoison wiki, it is pretty stupid; however, i
         * wanted to fit some sort of keyboard binding in here somewhere, and
         * this was the best fit for it.
         *
         * i was a little confused about .window vs. .subwindow for a while,
         * but a little RTFMing took care of that.  our passive grabs above
         * grabbed on the root window, so since we're only interested in events
         * for its child windows, we look at .subwindow.  when subwindow
         * None, that means that the window the event happened in was the same
         * window that was grabbed on -- in this case, the root window.
         */
        if(ev.type == KeyPress && ev.xkey.subwindow != None)
            XRaiseWindow(dpy, ev.xkey.subwindow);
        else if(ev.type == ButtonPress && ev.xbutton.subwindow != None)
        {
            /* now we take command of the pointer, looking for motion and
             * button release events.
             */
            XGrabPointer(dpy, ev.xbutton.subwindow, True,
                    PointerMotionMask|ButtonReleaseMask, GrabModeAsync,
                    GrabModeAsync, None, None, CurrentTime);

            /* we "remember" the position of the pointer at the beginning of
             * our move/resize, and the size/position of the window.  that way,
             * when the pointer moves, we can compare it to our initial data
             * and move/resize accordingly.
             */
            XGetWindowAttributes(dpy, ev.xbutton.subwindow, &attr);
            start = ev.xbutton;
        }
        /* the only way we'd receive a motion notify event is if we already did
         * a pointer grab and we're in move/resize mode, so we assume that. */
        else if(ev.type == MotionNotify)
        {
            int xdiff, ydiff;

            /* here we "compress" motion notify events.  if there are 10 of
             * them waiting, it makes no sense to look at any of them but the
             * most recent.  in some cases -- if the window is really big or
             * things are just acting slowly in general -- failing to do this
             * can result in a lot of "drag lag."
             *
             * for window managers with things like desktop switching, it can
             * also be useful to compress EnterNotify events, so that you don't
             * get "focus flicker" as windows shuffle around underneath the
             * pointer.
             */
            while(XCheckTypedEvent(dpy, MotionNotify, &ev));

            /* now we use the stuff we saved at the beginning of the
             * move/resize and compare it to the pointer's current position to
             * determine what the window's new size or position should be.
             *
             * if the initial button press was button 1, then we're moving.
             * otherwise it was 3 and we're resizing.
             *
             * we also make sure not to go negative with the window's
             * dimensions, resulting in "wrapping" which will make our window
             * something ridiculous like 65000 pixels wide (often accompanied
             * by lots of swapping and slowdown).
             *
             * even worse is if we get "lucky" and hit a width or height of
             * exactly zero, triggering an X error.  so we specify a minimum
             * width/height of 1 pixel.
             */
            xdiff = ev.xbutton.x_root - start.x_root;
            ydiff = ev.xbutton.y_root - start.y_root;
            XMoveResizeWindow(dpy, ev.xmotion.window,
                attr.x + (start.button==1 ? xdiff : 0),
                attr.y + (start.button==1 ? ydiff : 0),
                MAX(1, attr.width + (start.button==3 ? xdiff : 0)),
                MAX(1, attr.height + (start.button==3 ? ydiff : 0)));
        }
        /* like motion notifies, the only way we'll receive a button release is
         * during a move/resize, due to our pointer grab.  this ends the
         * move/resize.
         */
        else if(ev.type == ButtonRelease)
            XUngrabPointer(dpy, CurrentTime);
    }
}
Większość w powyższym kodzie to opisy w języku angielskim do poszczególnych sekcji, dlatego wydaje się on dłuższy.
Praktyczne zastosowanie - kiosk internetowy
Normalnych praktycznych zastosowań dla tego menadżera właściwie nie ma. (pewnie się zastanawiasz po co w ogóle ja to pisze) Jednym, które ma jakiś sens jest zastosowanie w kiosku internetowym, profesjonalnie zwanym kiosk mode. Jest to sama przeglądarka internetowa udostępniona użytkownikom końcowym.
Jako system bazowy posłużę się Debianem w wersji 6.0 beta 1. Obraz instalacyjny systemu w wersji 32 bitowej dostępny tutaj. Jako przeglądarkę internetową wykorzystam midori w wersji 0.2.9 pochodzącą z repozytorium Hadreta.
Oczywiście większość dystrybucji zawiera opisywany menadżer w swoich repozytoriach, wybrałem Debiana bo jego obraz instalacyjny miałem pod ręką.
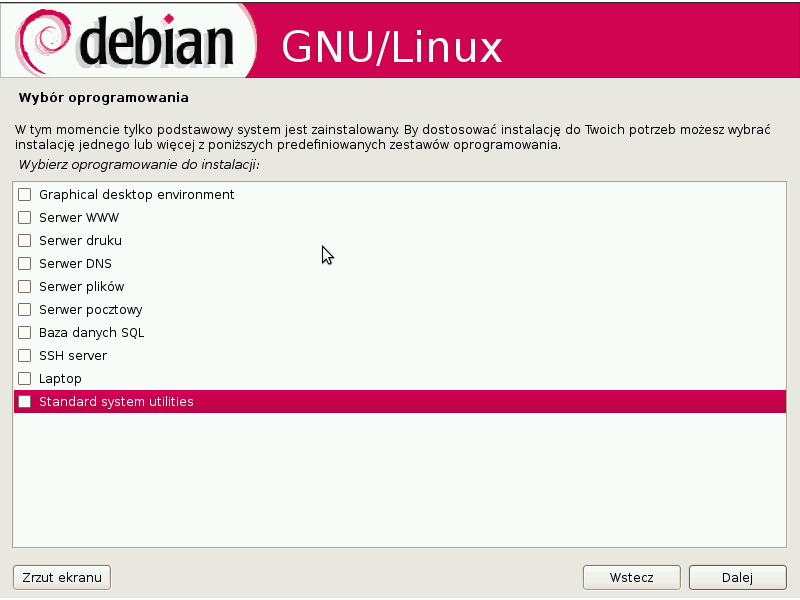
Instalujemy system klikając dalej, dalej itd. Wybieramy tylko system podstawowy, czyli na tym ekranie nie wybieramy nic.
Po zainstalowaniu systemu logujemy się na użytkownika root i instalujemy następujące paczki: apt-get install xorg tinywm midori
Jeśli ktoś chce nowsze midori musi dodać następujące repozytorium:
nano /etc/apt/sources.list
i dodać to:
deb http://hadret.rootnode.net/debian/ unstable main
(zapisuje się ctrl +x ) oraz wykonać polecenie wyżej. Po zainstalowaniu wylogowujemy się z roota i logujemy na użytkownika końcowego i wykonać polecenie:
nano ~/.xinitrc
i wkleić: * jeśli tylko zobaczyć jak działa sam menadżer:
xsetroot -solid black &
xterm &
tinywm
od razu z przeglądarką
xsetroot -solid black &
xterm &
midori &
tinywm
W pierwszym przypadku wygląda to tak:
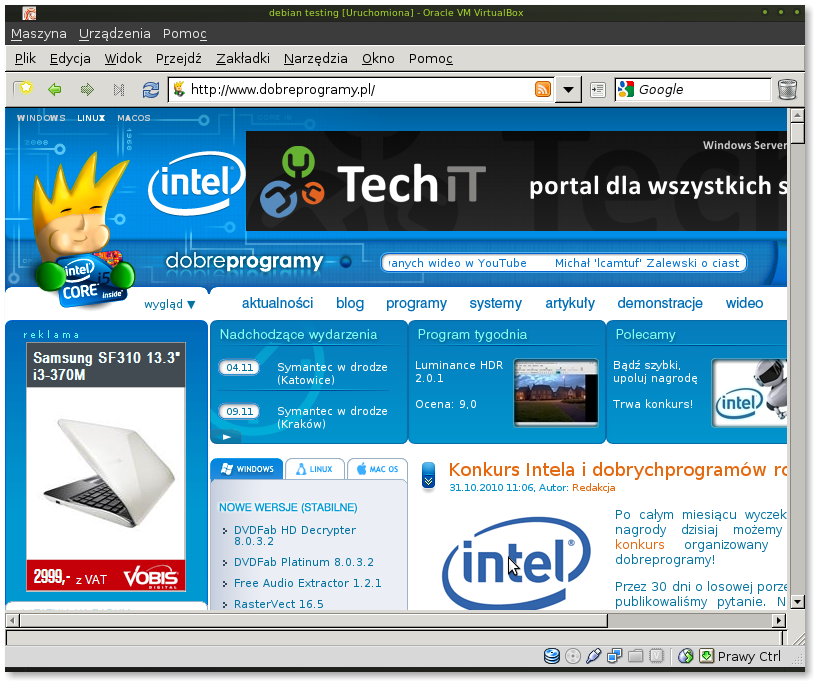
zaś w drugim:

Zmieniamy rozmiar przeglądarki i działa.
Część 2
TinyWM jako panel administratora
O ile system Windows Server ciężko się zarządza przez tryb tekstowy, to w systemach uniksowych jest prostsze. Pomimo tego wiele osób, które zaczynają swoją przygodę z administrowaniem serwerów pracujących pod kontrolą systemów Linux/BSD ma problem. Chciałyby najlepiej wszystko "wyklikać". W związku z tym, że im mniej zainstalowanych rzeczy w systemie serwerowym, tym bezpieczniej i wydajniej. Tutaj przedstawiane środowisko idealnie pasuje. Do prezentacji możliwości posłużę, że się systemem Debian Squezee (6.0) w wersji 32 bitowej działający na platformie XEN działającej na serwerze Dell R710.
Przygotowanie środowiska do pracy
Podobnie jak w przypadku web kiosku potrzebujemy X Window System i menadżer okien oraz serwera pulpitu zdalnego (vnc). Ten ostatni tylko w wypadku zdalnej konfiguracji.
apt-get install xorg xserver-xorg tinywm x11vnc
Konfiguracja pakietu x11vnc jest dostępna tutaj. Na przeszkodzie nie stoi również wykorzystanie jako serwera pulpitu zdalnego aplikacji NoMachine NX.
Również wykorzystuję następujące pakiety:
apt-get install feh htop irssi pcmanfm rxvt-unicode gmrun
- feh - jako menadżer tapety, by ładnie wyglądało
- htop - rozwinięta wersja programu top, menadżer zadań/uruchomionych procesów
- irrsi - klient sieci irc (zrzut 2)
- pcmanfm - lekki menadżer plików
- rxvt-unicode - w skrócie zwany urxvt - terminal
- gmrun - starter programów
Panel informujący administratora
Konfiguracja pliku .xinitrc:
feh --bg-scale ~/Debian_Grass_by_hadret.jpg &
urxvt -g 80x24+0+0 &
urxvt -g 80x24+0+0 &
gmrun &
tinywm
Ta konfiguracja uruchamia 2 terminale, które można przesunąć kombinacją klawiszy "lewy alt + lewy klawisz myszy" oraz starter programów.
Tak to wygląda w działaniu:
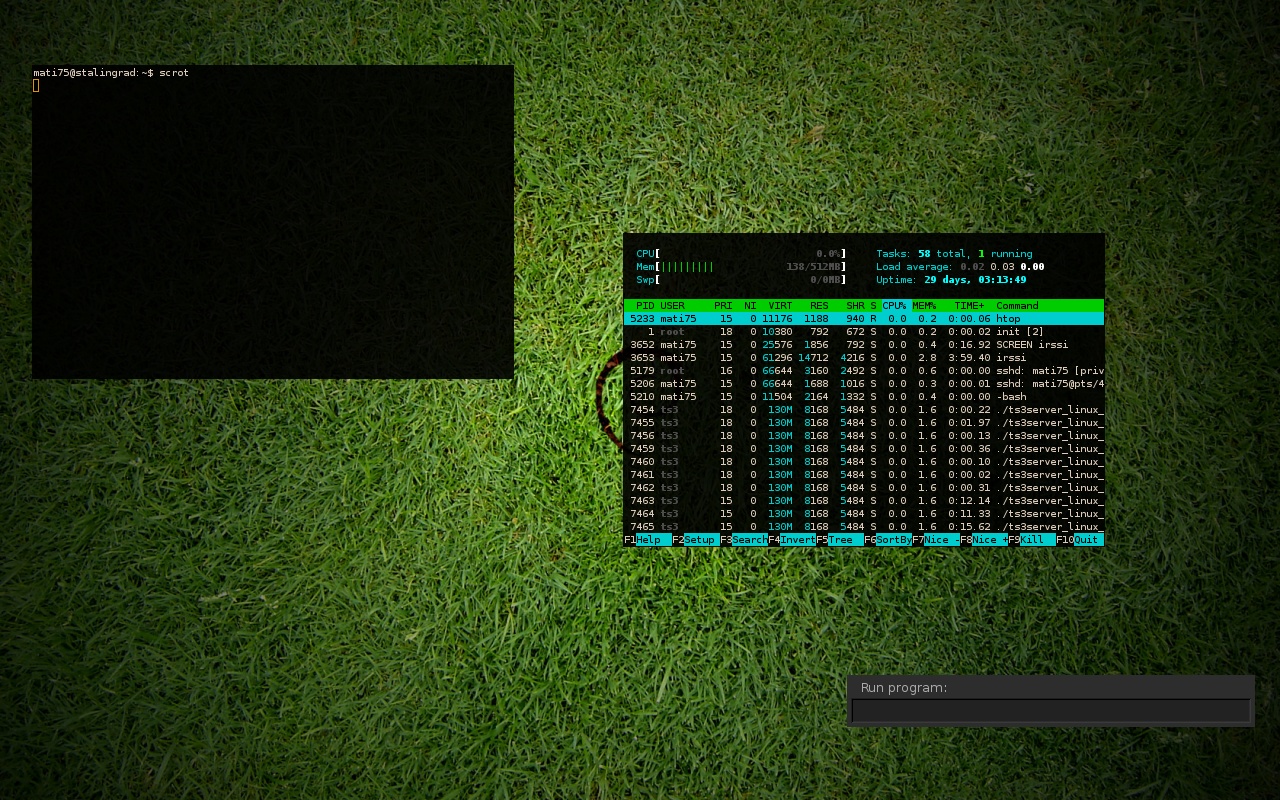
W terminalu została uruchomiona aplikacja htop.
Panel zarządzania plikami
Zauważyłem mało osób lubi korzystać z konsolowej aplikacji do zarządzania plikami mc. Wolą jednak klikać. Więc można również w takim przypadku wykorzystać menadżer TinyWM.
Konfiguracja pliku .xinitrc:
feh --bg-scale ~/Debian_Grass_by_hadret.jpg &
urxvt -g 80x24+0+0 &
pcmanfm &
gmrun &
tinywm
W tym przypadku wykorzystałem również aplikację lxappearance:
apt-get install lxappearance
aby dostosować wygląd menadżera, bo po standardowej instalacji za ładnie nie wygląda. Wykorzystałem do tego styl: Drakfire Black oraz ikony nuoveXT.2.2.
Wygląda to tak:
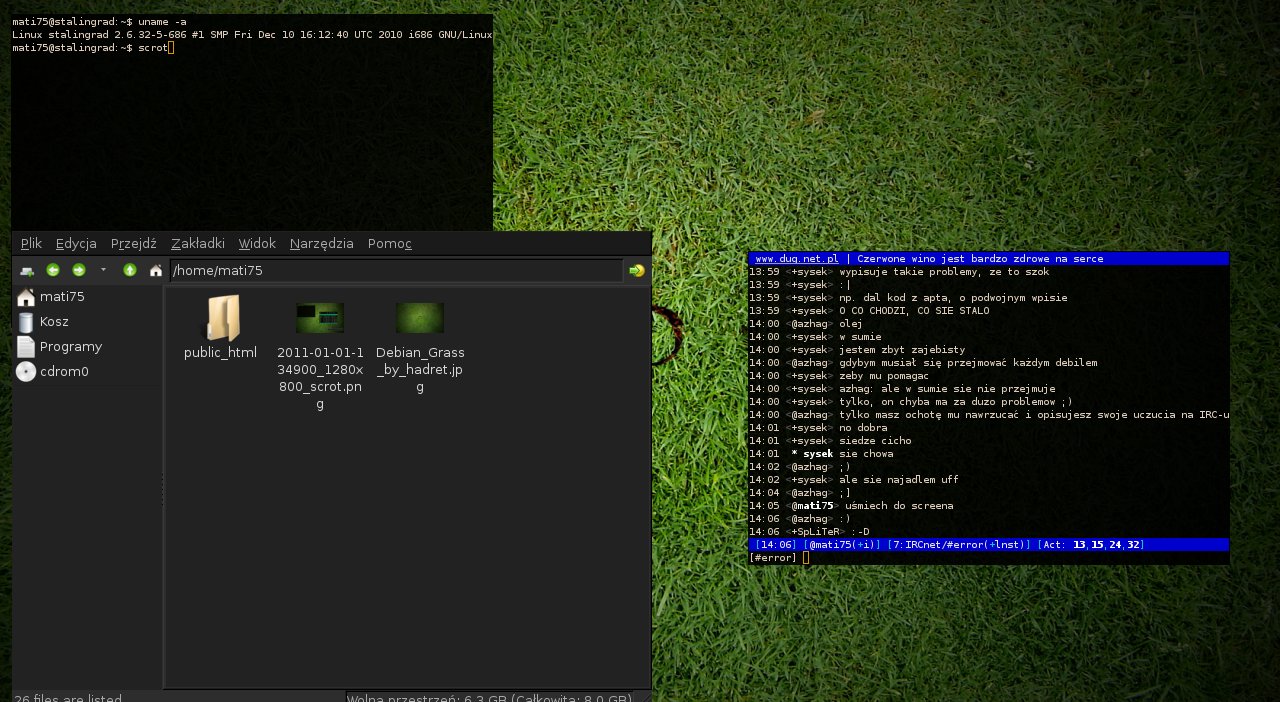
W terminalu została uruchomiona aplikacja irssi, służąca do komunikacji za pomocą sieci irc. W tym przypadku czysto dla rozrywki.
Podsumowanie
Myślę, że w zupełności zaprezentowałem możliwości tego malutkiego środowiska. Jeśli ma ktoś jakiś pomysł pisać, spróbuje zaprezentować. W niniejszej prezentacji wykorzystałem tapetę Debian Grass autorstwa Hadreta.
Pozdrawiam serdecznie!


